 30-09-2005, 09:38 PM
|
#1 | ||

    Join Date: Oct 2004
Location: Wimbledon, England
Posts: 1,624
|
Okie Dokie.
Before we get started I must say that the final product isn't brillant. The basic principals that I wll teach can be used to make MUCH better looking images.  ----- Step 1 Create a new document with the following dimensions.  Step 2 Select the paint bucket tool  Step 3 Fill the blank workspace, you should get something like this. Cool eh?  Step 4 Create a new layer (Keyboard Shortcut Shift + Ctrl + N) OR Press Layer > New > Layer  Step 5 Select the brush tool.  Step 6 Configure your brush,  Look for this toolbar.  Click on the little drop down arrow next to the Brush: part of the toolbar.  You will get a screen like the one below.  Select the set of brushes you would like, then select the brush you want. Step 7 Begin to brush in the opposite colour of the background (If its white paint with black. If its black paint with white.) After a few quick brush strokes you should get something like this.  Note: I used one of the brushes from Natural Brushes 2 and dragged it all over the image. Step 8 Create a new layer and then switch to the opposite colour of the one you just used to brush over your base background. See step 4 if you dont know how to create a new layer. Step 9 Brush some more! 
__________________
|
||


|
|
|
30-09-2005, 09:39 PM
|
#2 | ||
|
Join Date: Oct 2004
Location: Wimbledon, England
Posts: 1,624
|
Step 10 Repeat steps 8-9 a few times. Feel free to change brushes as I did. Hopefully you will end up with something like this.
 Hint: Just play around until you get something you like, you can adjust opacity of layers as well as delete them if need be. If you are following Taikara's tutorial you may now return to it. Step 11 Open the layers window (F7)  Step 12 Press the half black & half white circle. You will get a drop down like this  Press Colour Balance Step 13  Browse through Shadows/Midtones/Highlights in turn and adjust the sliders. Press OK You will get something like this,  I used the following: Highlights -17,+2,+62 Midtones - -76,-64+68 Shadows - -85,0,+26 Step 14 Add your main image.  Step 15 Add your text, use a suitable font. For my text I added a 2 pixel stroke and a drop shadow. To add a Stroke/Drop shadow right click the text layer and select blending options from the drop down menu. Your image should now look like this.  Step 16 Add a border. Mine is a simple 1 pixel line that goes around the entire image. I did this with the pencil tool.  Hopefully the image youve made will look respectable at the very least, this is a very simple image however using these basic principles youll soon be able to make some very cool images. Using the above methods images such as the following can be produced:  :w00t:
__________________
|
||
|
|
|
|
30-09-2005, 09:40 PM
|
#3 | ||

Join Date: Jan 2005
Location: Wilmington, United States
Posts: 2,660
|
Bravo Magic!
Only problem, what program did you use?
__________________
Youtube Channel - http://youtube.com/user/BloodPigggy My Site - http://sites.google.com/site/eyenixon |
||
|
|
|
|
30-09-2005, 09:52 PM
|
#4 | ||

 Join Date: Jun 2005
Location: Edinburgh, Scotland
Posts: 1,493
|
Quote:

__________________
Please click on the baby dragon eggs to help them grow -   |
||
|
|
|
|
30-09-2005, 10:01 PM
|
#5 | ||
   Join Date: Jan 2005
Location: Shella, Kenya
Posts: 710
|
who-hoa-hoah.
Methinks I have competition. Must improve background-making techniques! Seriously, Magic, great job, and I love the font for the first and last example sigs! |
||
|
|
|
|
30-09-2005, 10:02 PM
|
#6 | ||
|
Join Date: Jan 2005
Location: Wilmington, United States
Posts: 2,660
|
Quote:
[/b][/quote]Um, that's just a website with art and stuff.
__________________
Youtube Channel - http://youtube.com/user/BloodPigggy My Site - http://sites.google.com/site/eyenixon |
||
|
|
|
|
30-09-2005, 10:08 PM
|
#7 | ||
|
Join Date: Jan 2005
Location: Shella, Kenya
Posts: 710
|
I'm fairly certain he's using Photoshop... probably version 7.0
|
||
|
|
|
|
30-09-2005, 10:38 PM
|
#8 | ||
|
Join Date: Oct 2004
Location: Wimbledon, England
Posts: 1,624
|
Photoshop it is, the tutorial should apply to most graphic editing programs though
 Ah heres something im about to post in my gallery... I was just resitting the tutorial myself and applying the techniques properly 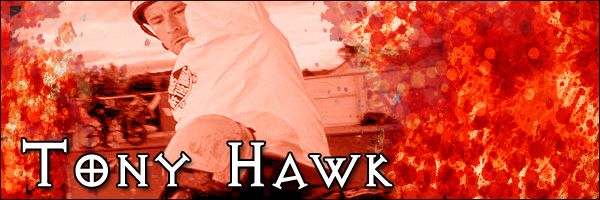 @ Tai, glad you like it.. competition will only make us both better :w00t: @ Piggy, I love you :eeeeeh: Serious though, thanks for the bravo
__________________
|
||
|
|
|
|
30-09-2005, 11:14 PM
|
#9 | ||
 Join Date: May 2005
Location: ,
Posts: 159
|
Woooheeee! I will use your tutorial :P great job magic
 |
||
|
|
|
|
30-09-2005, 11:54 PM
|
#10 | ||
|
Join Date: Oct 2004
Location: Wimbledon, England
Posts: 1,624
|
Tell me how easy it is/was to understand when your done with it Urb. I'll revise it if neccessary.
__________________
|
||
|
|
|

|
 Similar Threads
|
||||
| Thread | Thread Starter | Forum | Replies | Last Post |
| I need a Java tutorial... | Fubb | Programming | 12 | 13-04-2009 10:26 AM |
| Painless Ftp Tutorial | The Fifth Horseman | Old News | 10 | 07-08-2007 09:55 AM |
| Little Help With The Doxbox Tutorial! | Guest | Troubleshooting | 18 | 03-08-2007 05:27 PM |
| Coloring Tutorial | Himmler | Music, Art, Movies | 4 | 19-08-2005 03:43 AM |
|
|
||


 Linear Mode

