 02-10-2005, 03:33 AM
|
#1 | ||
    Join Date: Jan 2005
Location: Shella, Kenya
Posts: 710
|
Since Magic posted a nifty basic brushed background effect, I thought I'd kick it up a notch Emeril-style and share some advanced methods that use his tutorial as a base.
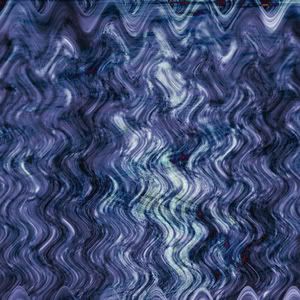
Using this tutorial, you should be able to achieve a distorted glowy effect, like this:  Software used: Photoshop 7.0 Note: I have provided my own results in links for almost every step to give a general idea of how it should look. Step 1: Open a new file. Use a size larger than what the background is intended for. I typically use 800x800, but it does not need to be that big - it just gives options.  Step 2: Follow Magic's Background Tutorial until you come up with a nice blend of black and white. The "rougher" it ends up looking, the better, you'll end up smoothing it out. Don't color it yet. When you're done, if you've used layers, go to: Layers > Flatten Image Mine turned out like this:  Step 3: Go to Filter > Distort > Polar Coordinates and set it to Polar to Rectangular, like so:  My Result Step 4: While the newly distorted layer is selected, press Ctrl+J three times. This will copy the layer. To do it manually, go to Layer > Duplicate Layer and repeat three times. To make the next steps less confusing, make all of the layers invisible except for the bottom one, by clicking on the eye icon next to the layer in the Layers tab menu:  Step 5: Click on the next layer up, making it visible again. Go to Filters > Distort > Shear and drag the line until it looks something like this (and make sure that Wrap Around is checked):  My Result Step 6: Click on the next layer up, making it visible again. Repeat Step 5, but change the shape of the waves by messing with the line again. My Result Step 7: Click on the next layer up, you got it... making it visible again. Go to Filters > Distort > Wave and make your settings like so:  My Result Step 8: Starting at the top layer, and by clicking the Blending drop down menu found under the Layers tab:  and set your Blending Modes like so: Waved layer: Screen Sheared layers: Multiply Polar Coordinated layer: Leave Normal Step 9: Select the bottom layer and press Ctrl+U. This will bring up the Hue/Saturation menu. To pull up this menu without hot-keys, go to Image > Adjustments > Hue/Saturation. Check the Colorize option like so:  Fiddle with the settings until you have something that pleases you. Repeat this step for all remaining layers. My Results: Polar Coordinate - Color Shear 1 - Color Shear 2 - Color Wave - Color Step 10: Sit back and enjoy your new background:  Note: You may need to change blending modes to achieve a nice effect with the colors you choose... just switch from Screen to Multiply as desired. Once you're done, you can cut out a part of the background for a siggie or banner. Whee! |
||


|
|
|
02-10-2005, 04:16 AM
|
#2 | ||

  Join Date: Jan 2005
Location: Wilmington, United States
Posts: 2,660
|
My turned out to look more like some kind of weasel (??) like shape.
Don't ask me to explain. I'll try it again, but these tutorials are all helpful. Maybe someone can pick em all up and throw them into a sticky.
__________________
Youtube Channel - http://youtube.com/user/BloodPigggy My Site - http://sites.google.com/site/eyenixon |
||
|
|
|
|
02-10-2005, 05:41 AM
|
#3 | ||
|
Join Date: Jan 2005
Location: Shella, Kenya
Posts: 710
|
Aww, I'd like to see it, maybe I could help figure out what went wrong.
I think the most important step is creating the original black and white background. You have to have a balanced blend of black and white for it to turn out nicely. I suggest practicing Magic's tutorial until you can get an effect somewhat close to what I posted as my basic black and white background. Also, it helps if you try using the exact same size that's used in the tutorial... some of the effects will turn out a bit differently, and if you aren't familiar with tweaking filters, then using the same image dimensions will help you get familiar, while still allowing you to create the same effect. It's not a huge thing, but it can make a difference... That's why I included my new file menu screen  Unfortunately, this effect uses some of the more "tweaky" filters, so it will be a bit more difficult to reproduce.  |
||
|
|
|
|
02-10-2005, 05:55 AM
|
#4 | ||

Join Date: Jul 2005
Posts: 1,127
|
Perhaps a forum in this forum titled 'Tutorials'
__________________
|
||
|
|
|
|
02-10-2005, 09:25 AM
|
#5 | ||

 Join Date: Oct 2004
Location: Wimbledon, England
Posts: 1,624
|
My finished products from the tutorial
  Also, after having my background made. I did the following. The Magic Step Go to Image > Duplicate Go to Layer > Flatten Image Go to Image > Adjustments > Desaturate Add a colour balance layer. Add a brightness/contrast layer. Look at your.. magic background. I got theese 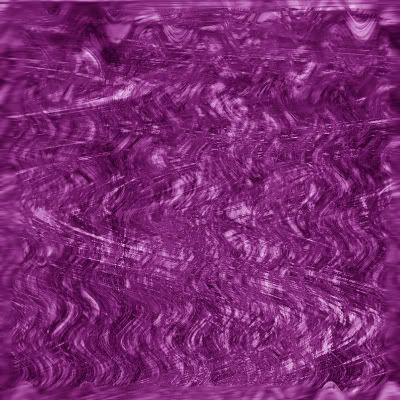  
__________________
|
||
|
|
|
|
02-10-2005, 11:17 AM
|
#6 | ||
 Join Date: May 2004
Location: Orlando, United States
Posts: 4,787
  |
Another excellent tutorial! :Brain:
Too bad no-one has made one for Paint Shop Pro yet, looks like it would be fun to try these techniques out. Cheers for the tutorial makers. 
__________________
ViGERP AKA what I have been working on these last couple of years... |
||
|
|
|
|
02-10-2005, 11:24 AM
|
#7 | ||
|
Join Date: Oct 2004
Location: Wimbledon, England
Posts: 1,624
|
Paint Shop Pro.
I didn't know that anybody here actually used that.
__________________
|
||
|
|
|
|
02-10-2005, 11:33 AM
|
#8 | ||
|
Join Date: Jul 2005
Posts: 1,127
|
Nor did I. A new av Magic. :bleh:
__________________
|
||
|
|
|
|
02-10-2005, 03:03 PM
|
#9 | ||
 Join Date: Jan 2005
Location: Hofudborgarsvadi, Iceland
Posts: 206
|
cool it worked nice one it would be cool to have a sub forum with tutorials
 keeep up teh good work keeep up teh good work  k: k: |
||
|
|
|
|
02-10-2005, 04:19 PM
|
#10 | ||
|
Join Date: Oct 2004
Location: Wimbledon, England
Posts: 1,624
|
That could always be an option in the future, for now I see not the point. We have only two tutorials
I'll be writing more in the future when I have time to do so. I know for a fact that Tai is always very busy so I doubt she'll be capable of squeezing out loads of tutorials in a short space of time. When we get about 10 or more tutorials I think we should look into getting a section dedicated to them and the artworks produced whilst taking them. Until then, stickies are great
__________________
|
||
|
|
|

|
 Similar Threads
|
||||
| Thread | Thread Starter | Forum | Replies | Last Post |
| Painless Ftp Tutorial | The Fifth Horseman | Old News | 10 | 07-08-2007 09:55 AM |
| Little Help With The Doxbox Tutorial! | Guest | Troubleshooting | 18 | 03-08-2007 05:27 PM |
| Taffy Pull Background Tutorial | taikara | Art Tutorials | 24 | 08-10-2005 11:13 PM |
| Photobrush Background | taikara | Art Tutorials | 16 | 08-10-2005 03:24 PM |
| Background Music For Fight Scene | The_Toad | Blah, blah, blah... | 25 | 27-05-2005 11:47 AM |
|
|
||


 Linear Mode

